

Are you seeing the “ERR_CONNECTION_TIMED_OUT” error in your browser? Not a very helpful error message, is it? Then it’s always good to be aware of common errors like these that might prevent you from getting access to your website.
In today’s post, we’re going to take a deep dive into the “ERR_CONNECTION_TIMED_OUT” error and examine why you might see this and what you can do to fix it quickly. Simply put, it’s an indication that the system is unavailable and the time given for one to connect has elapsed, and now the request has timed out. But what does that actually mean?
What is the ERR_CONNECTION_TIMED_OUT Error?
An ERR_CONNECTION_TIMED_OUT error typically means there is something wrong with your local network connection.
When you visit a website and it doesn’t load, your browser will try for around 30 seconds or so until it terminates the connection. After which it will return an “ERR_CONNECTION_TIMED_OUT” error, indicating a communication problem.
Due to all the different web browsers and operating systems, the error can present itself in a number of different ways. But most of them have the same or similar meaning. “ERR_NETWORK_CHANGED” and “ERR_CONNECTION_REFUSED” are two very closely related errors that can usually be solved with the same troubleshooting steps below.
Below are a few examples of how the error might present itself in different browsers.
Mozilla Firefox
In Mozilla Firefox the error will show as “The connection has timed out.” The server at domain.com is taking too long to respond.
Microsoft Edge
In Microsoft Edge, the error will show as “Hmmm… can’t reach this page. Domain.com took too long to respond.” In Edge, however, it does also contain the “ERR_CONNECTION_TIMED_OUT” error.
Safari
In Safari, the error will show as “Safari Can’t Open the Page. Safari can’t open the page domain.com because the server where this page is located isn’t responding.”
How to Fix the ERR_CONNECTION_TIMED_OUT Error
This error is a client-side problems (issues with your network connection or firewall)
1. Check Your Connection
Google Chrome, Firefox, and Edge all recommend that you should check your network connection. While this might sound obvious, they all point to checking your connection first as it’s one of the most common reasons for the error. Here are a few things we recommend:
- Restart your home or office router. This only takes a few minutes and solves more problems than a lot of people would like to admit. To completely power cycle it, disconnect the power supply and then wait 30 seconds before plugging it back in.
- Check to see if you’re on a bad or slow wifi connection. This is a common occurrence on busy public wifi hotspots such as coffee shops or airports.
2. Disable Firewall and Antivirus Software Temporarily
Firewalls and antivirus software are intended to protect users and their systems. They scan your device regularly and automatically block any suspicious activity. However, this type of security can at times lead to connection issues.
This is because firewalls can often block pages they don’t need to or reject content that is completely safe. We’ve seen this happen many times with software like AVG. To check whether this is the case for you, try disabling your firewall and antivirus programs. Of course, this is only advised if you know for sure that the site you’re intending to visit is safe.
Additionally, you should only disable this kind of software temporarily. Switch it back on after you’ve finished checking to see whether the error has been resolved, so you don’t become vulnerable to attacks. If you repeatedly encounter errors because of your firewall or antivirus software, you may want to consider changing what you’re using.
These types of tools also have what is called a “false-positive” report you can fill out. If you’re 100% positive that a site your visiting is blocked and shouldn’t be, you can let the software developer know. Here are a few quick links:
3. Disable Proxy Settings
Sometimes you might see the ERR_CONNECTION_TIMED_OUT error if you are utilizing a proxy service. This is usually pretty rare, especially on the client-side. However, one might have been set without you even knowing it. To disable or check to ensure no proxy settings are enabled, follow these steps.
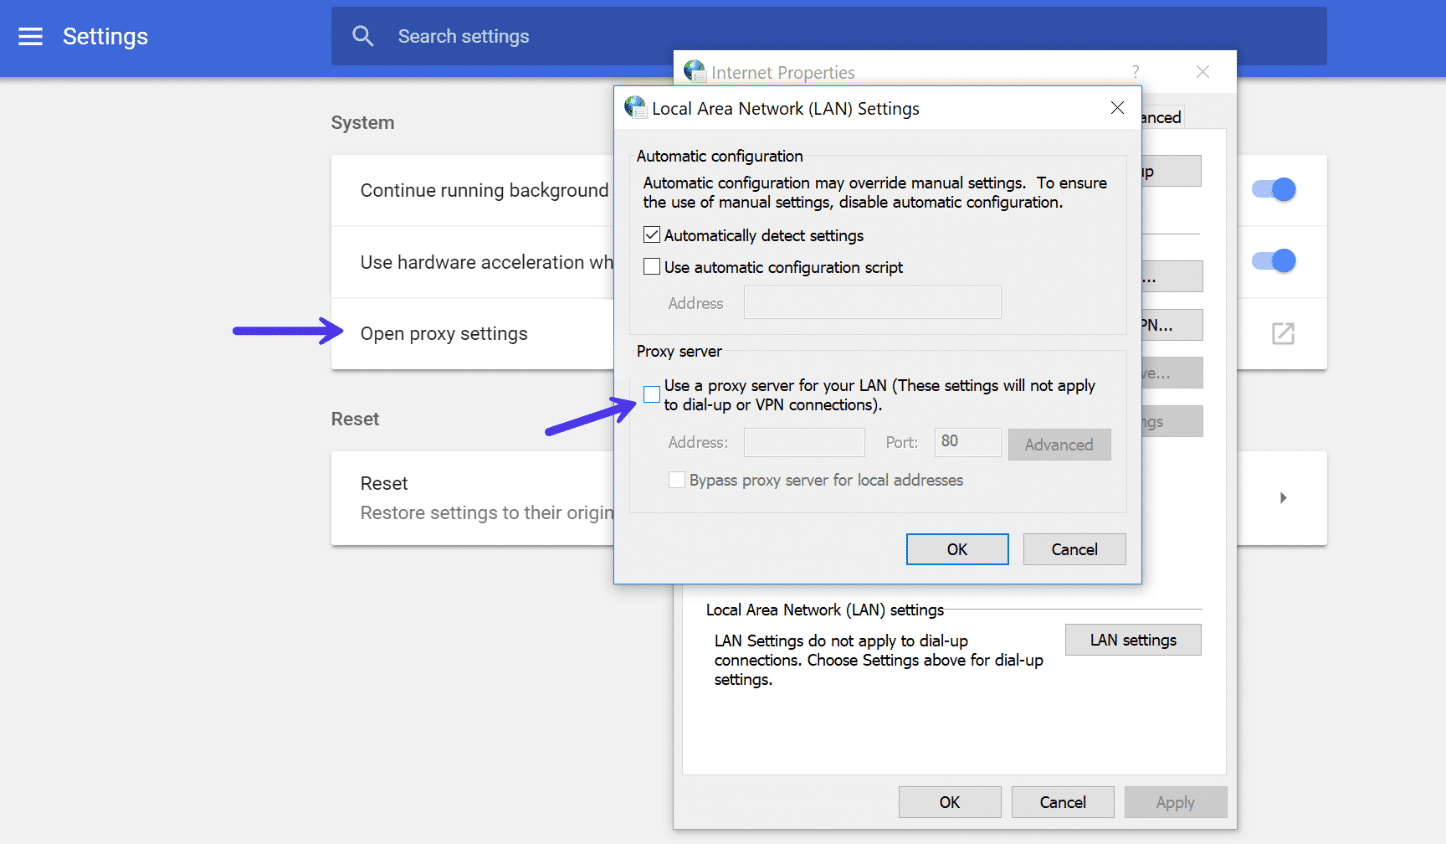
Access the Settings menu in your Chrome browser. This will open up the complete menu of options. Under the System section (you’ll need to click Advanced at the bottom to see this), you should find an entry titled Open proxy settings. By selecting it, you’ll be taken to the corresponding menu:
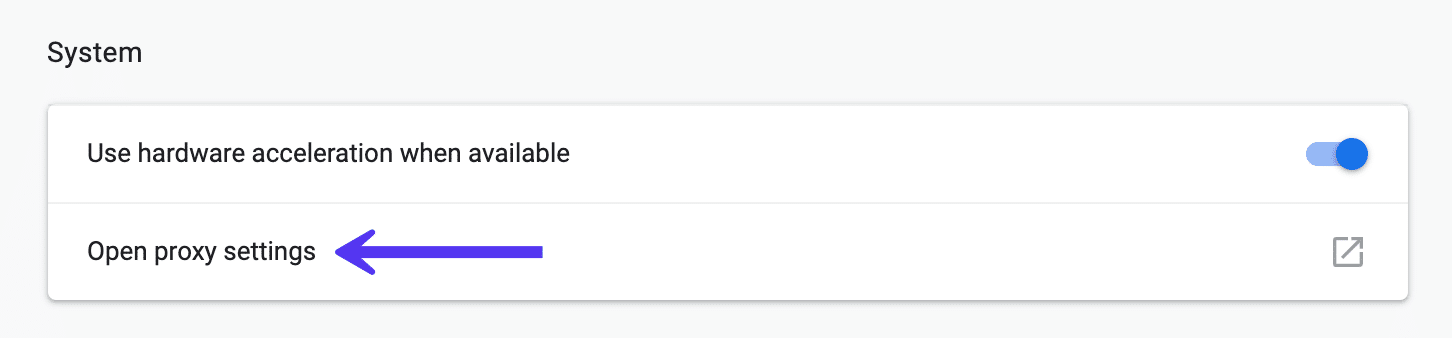
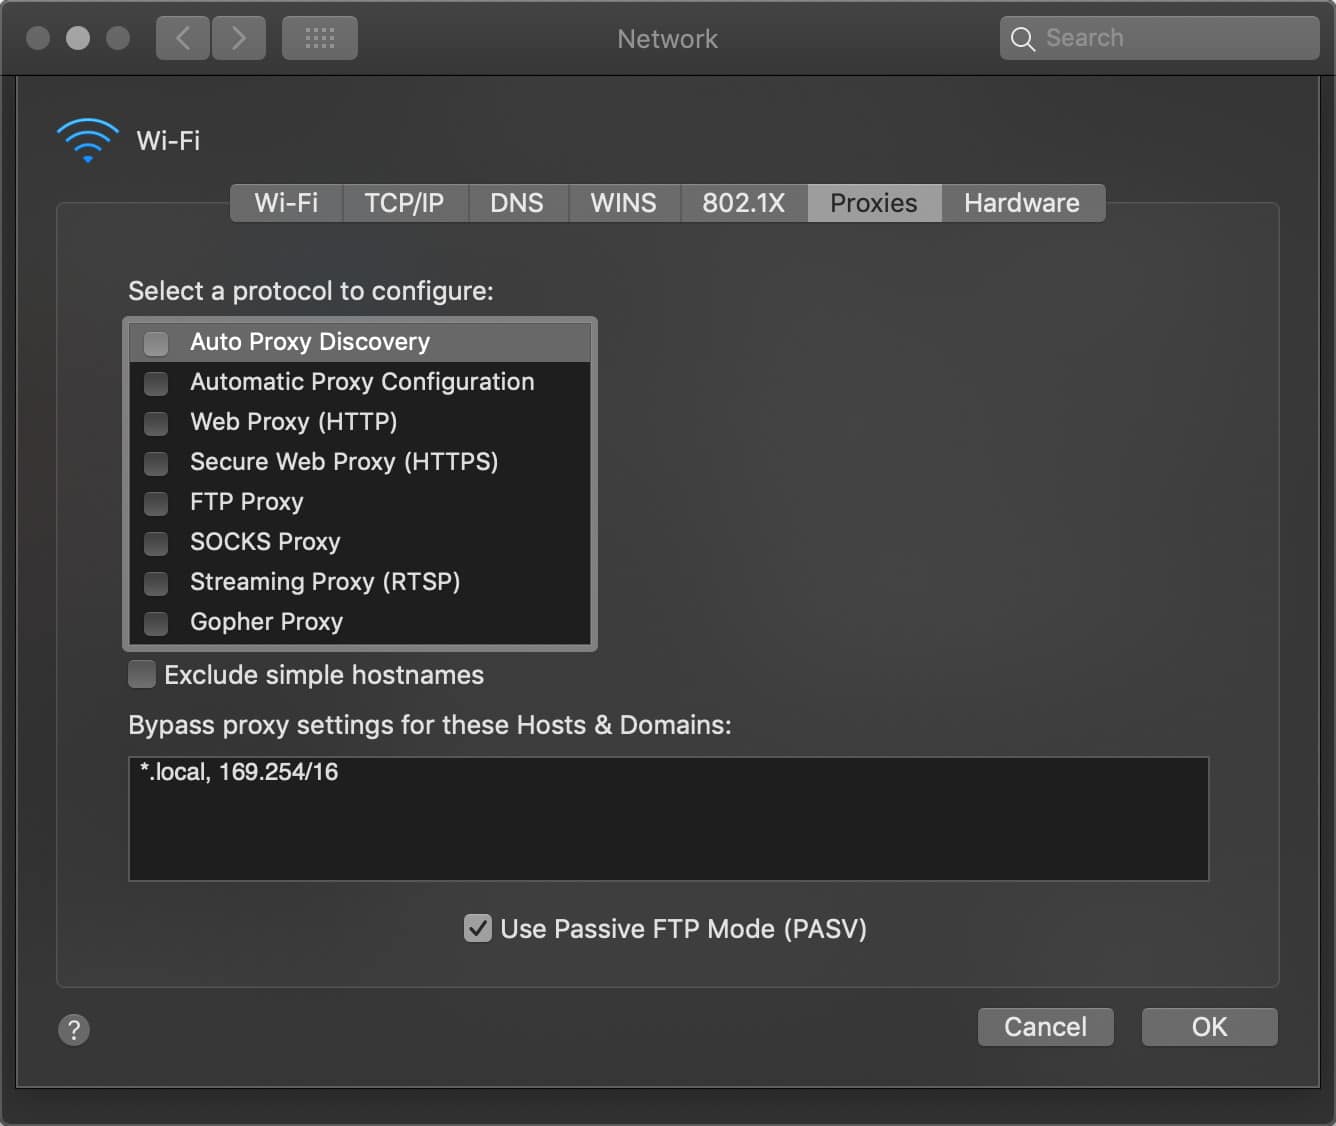
Your next step depends on the system you’re currently using. Windows users will want to click on LAN Settings and uncheck the Use proxy server for LAN option. If you’re a Mac user, you should immediately find yourself in the relevant menu. You’ll then have to uncheck all selectable proxy protocols and check to see if the ERR_CONNECTION_TIMED_OUT message has been resolved.
If you’re on Windows, you will see a “Local Area Network (LAN) Settings” window appear. You will want to confirm that the “Use a proxy server for your LAN” option is unchecked.
The same goes if you’re using a VPN like ExpressVPN or TunnelBear. Make sure you’re not connected by accident.
4. Change DNS Servers
The next thing you can try is changing your DNS servers. By default, DNS servers are automatically assigned by your ISP. But you could try temporarily changing these to a public DNS server, such as Google or Cloudflare.
- Some prefer to use Google’s public DNS (8.8.8.8 and 8.8.4.4) long-term due to them sometimes being more reliable.
- Cloudflare also offers secure and blazing fast free DNS (1.1.1.1 and 1.0.0.1) which we will be using in this example. If you want to use Google’s the steps are the same, you simply replace the DNS server addresses with Googles.
Tip: If you’re already using a free DNS server and having issues, removing it and defaulting back to your ISP’s DNS servers also sometimes fix things.
Google and Cloudflare aren’t perfect 100% of the time and there have been a few instances where we’ve noticed switching back has resolved the issue. This is especially true if you’re using a Wifi hotspot in an airport or coffee shop.
Windows
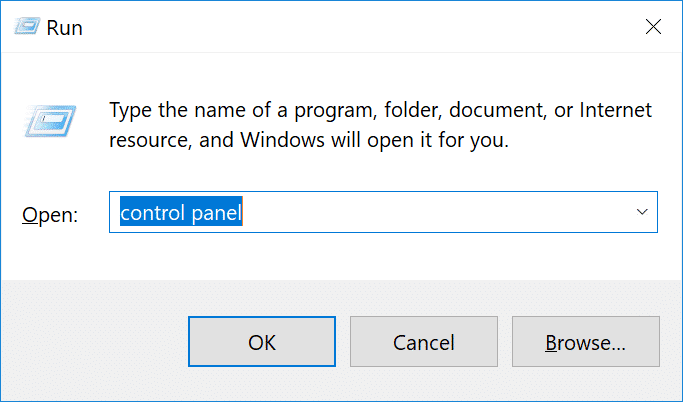
In Windows simply open up Command Prompt by pressing the Windows logo key and R. Then type “control panel” and hit Enter.
Click on “Network and Internet” and then “Network and Sharing Center.” On the left-hand side, click on “Change Adapter Settings.”

Right click on your current connection, this will either be Local Area Connection or Wireless Network Connection based on how you’re connecting. Then click on “Properties.”
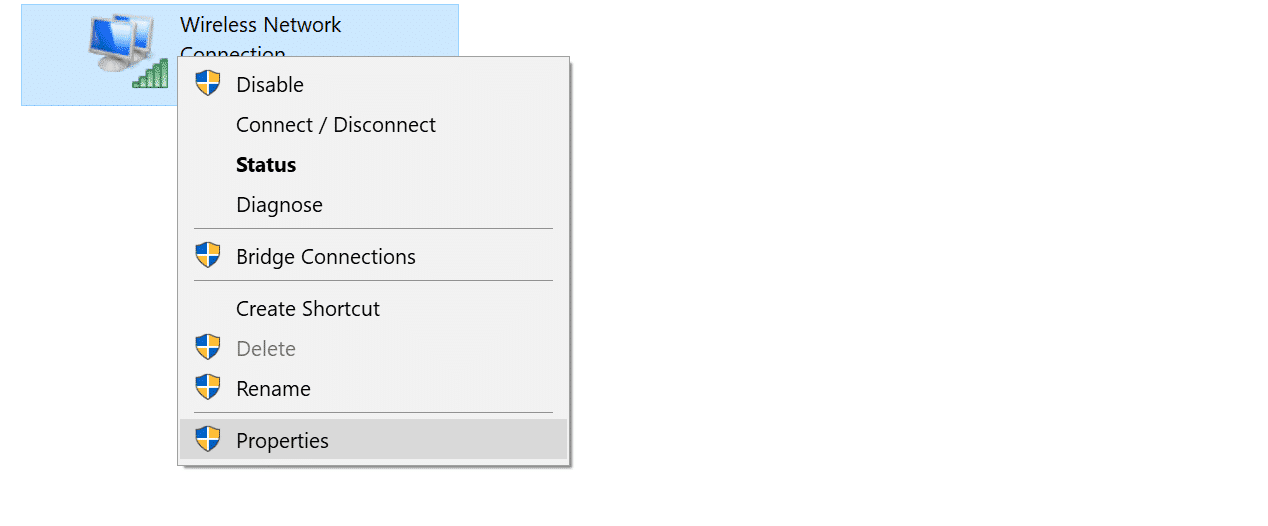
Wireless connection properties
Select Internet Protocol Version 4 (or Version 6 if desired) and click on “Properties.”
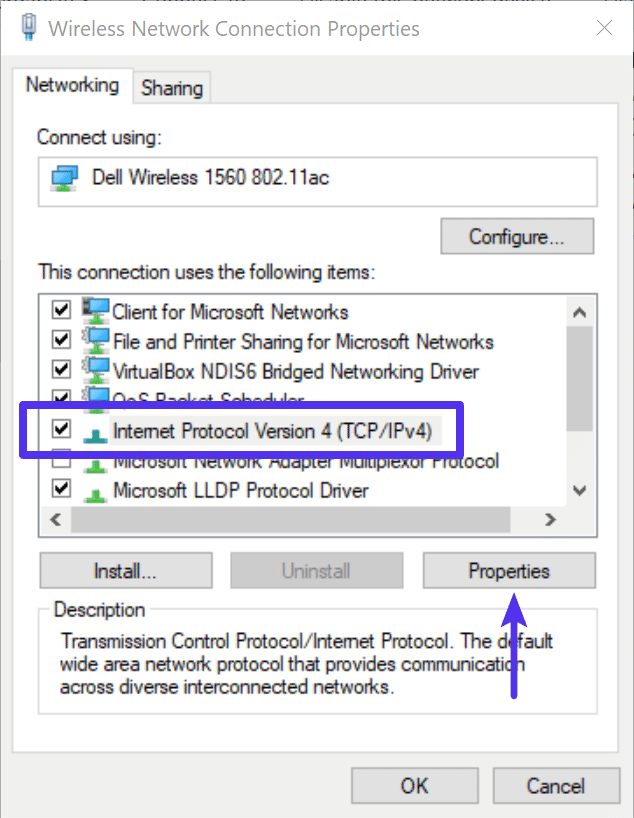
IPV 4 properties
Make a note of any existing settings in case you need to revert back. Click “Use the following DNS server addresses.” Enter the following, or replace the existing with these:
For IPv4: 1.1.1.1 and 1.0.0.1
For IPv6: 2606:4700:4700::1111 and 2606:4700:4700::1001
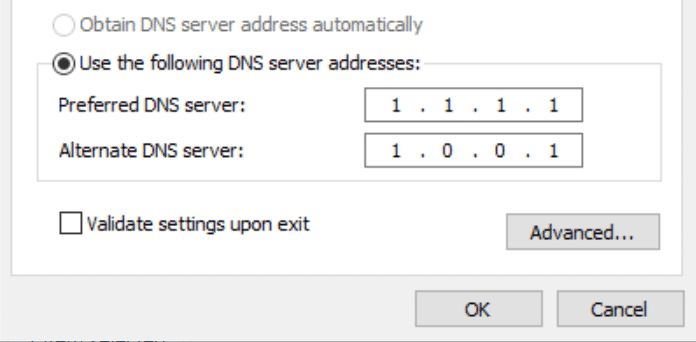
DNS server addresses
Click OK, then Close. Restart your browser.
Mac
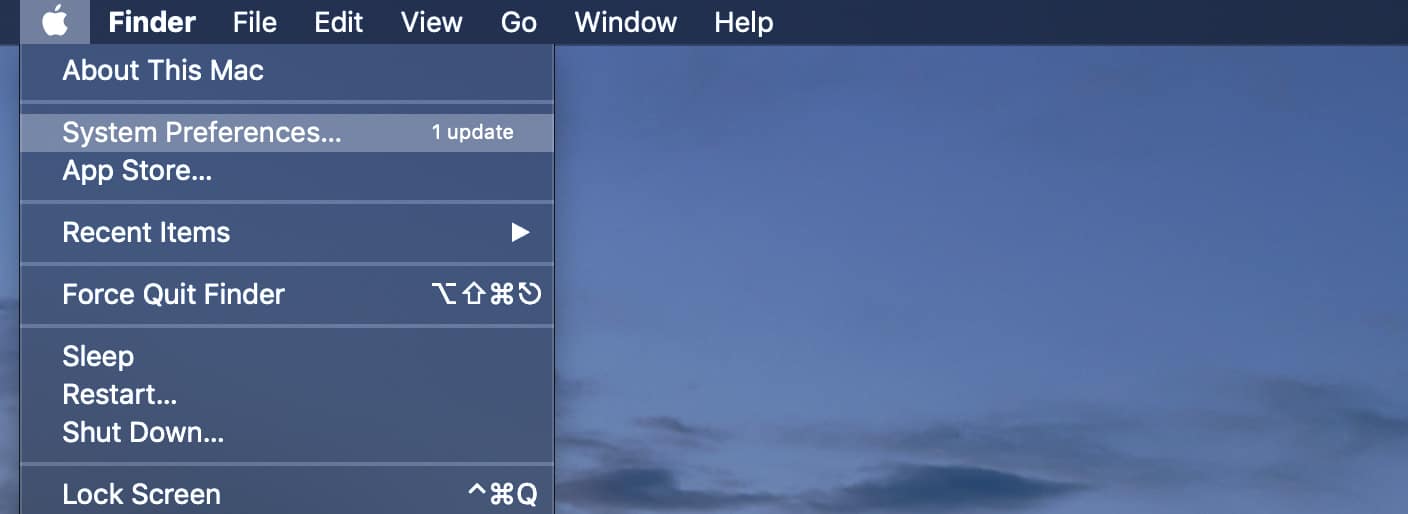
To change DNS servers on a Mac, go to System Preferences…
Mac system preferences
Click on the network icon and then click “Advanced.”
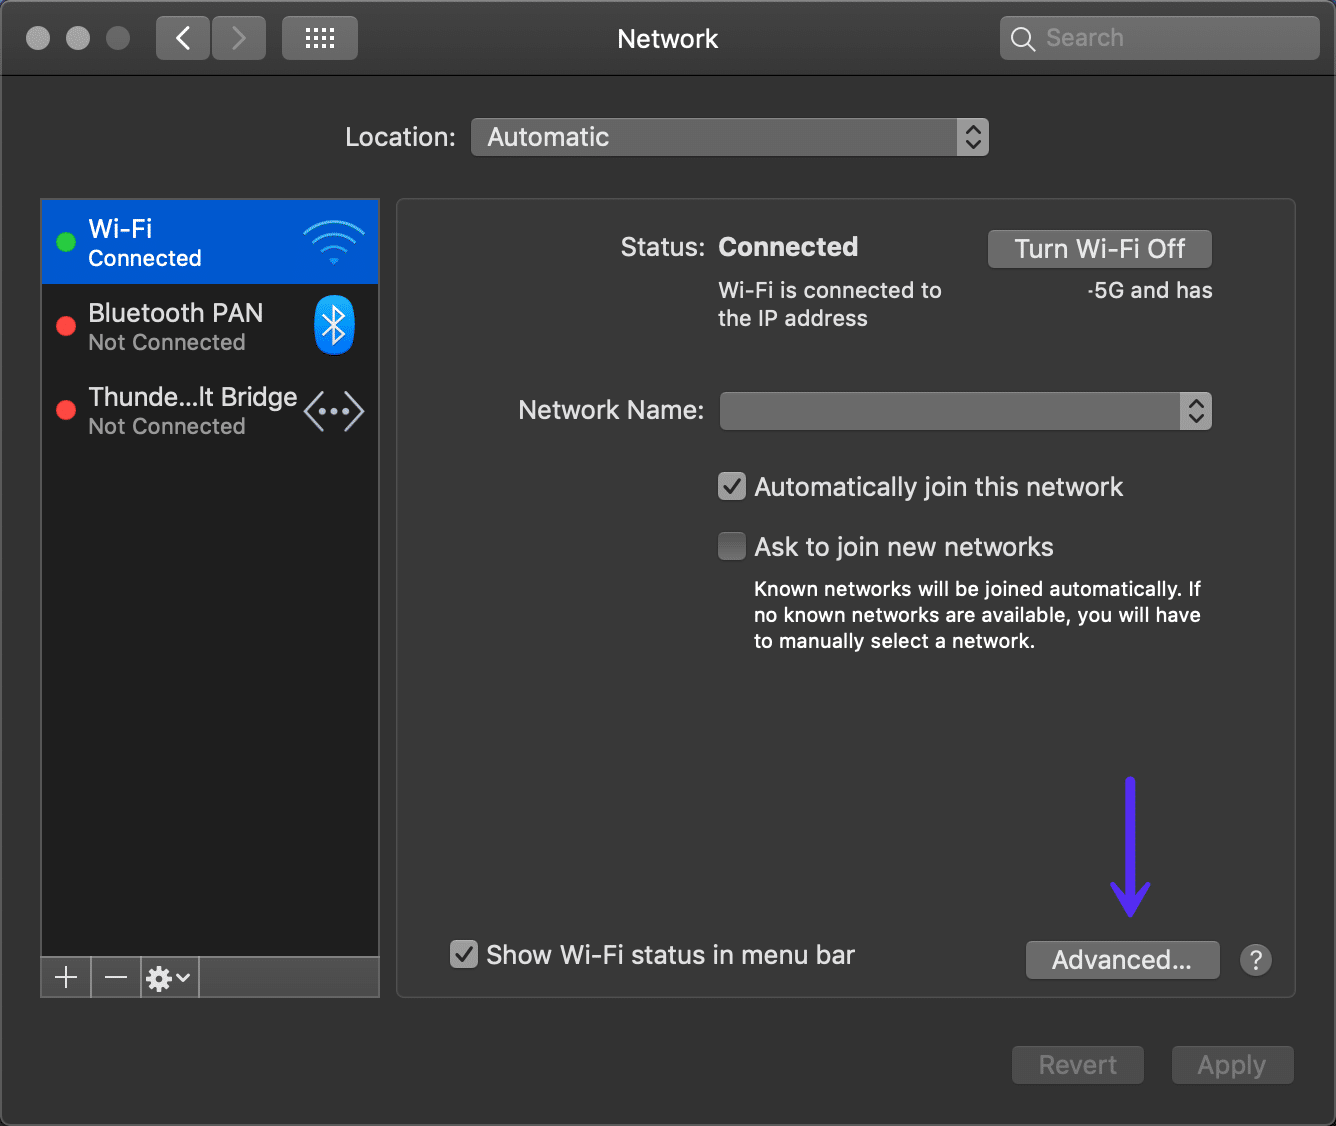
Mac network advanced
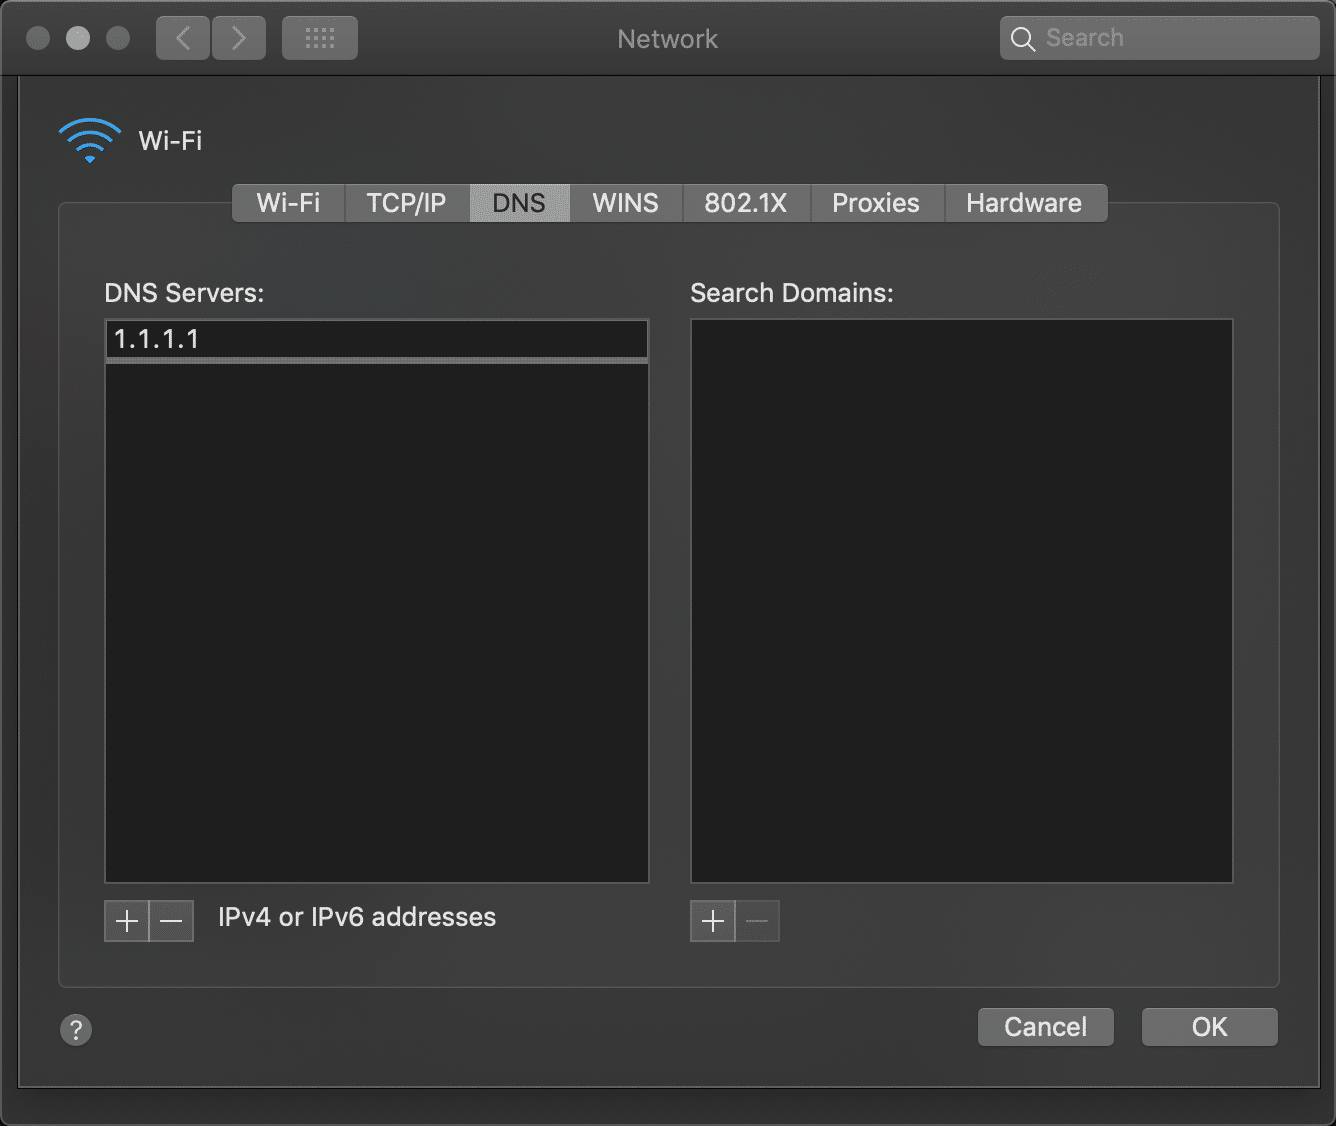
Click on the “DNS” tab.
Mac DNS
Then add Cloudflare’s DNS server addresses.
For IPv4: 1.1.1.1 and 1.0.0.1
For IPv6: 2606:4700:4700::1111 and 2606:4700:4700::1001
5. Flush/Renew DNS
You can also try flushing your local DNS cache. This is similar to clearing your browser cache. It could be that the site you’re trying to visit isn’t resolving to the correct IP address.
Windows
In Windows simply open up Command Prompt and enter the following:
ipconfig /flushdns
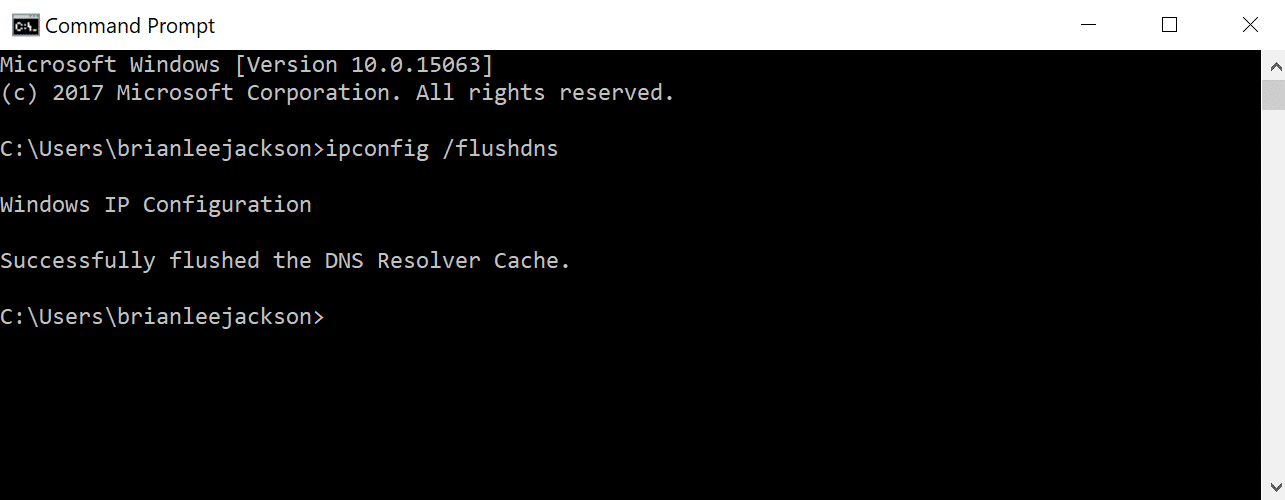
Command prompt – flush DNS
You should see a “Successfully flushed the DNS resolver Cache” if it worked.
Mac
For macOS users, you can enter the following in the terminal:
dscacheutil -flushcache
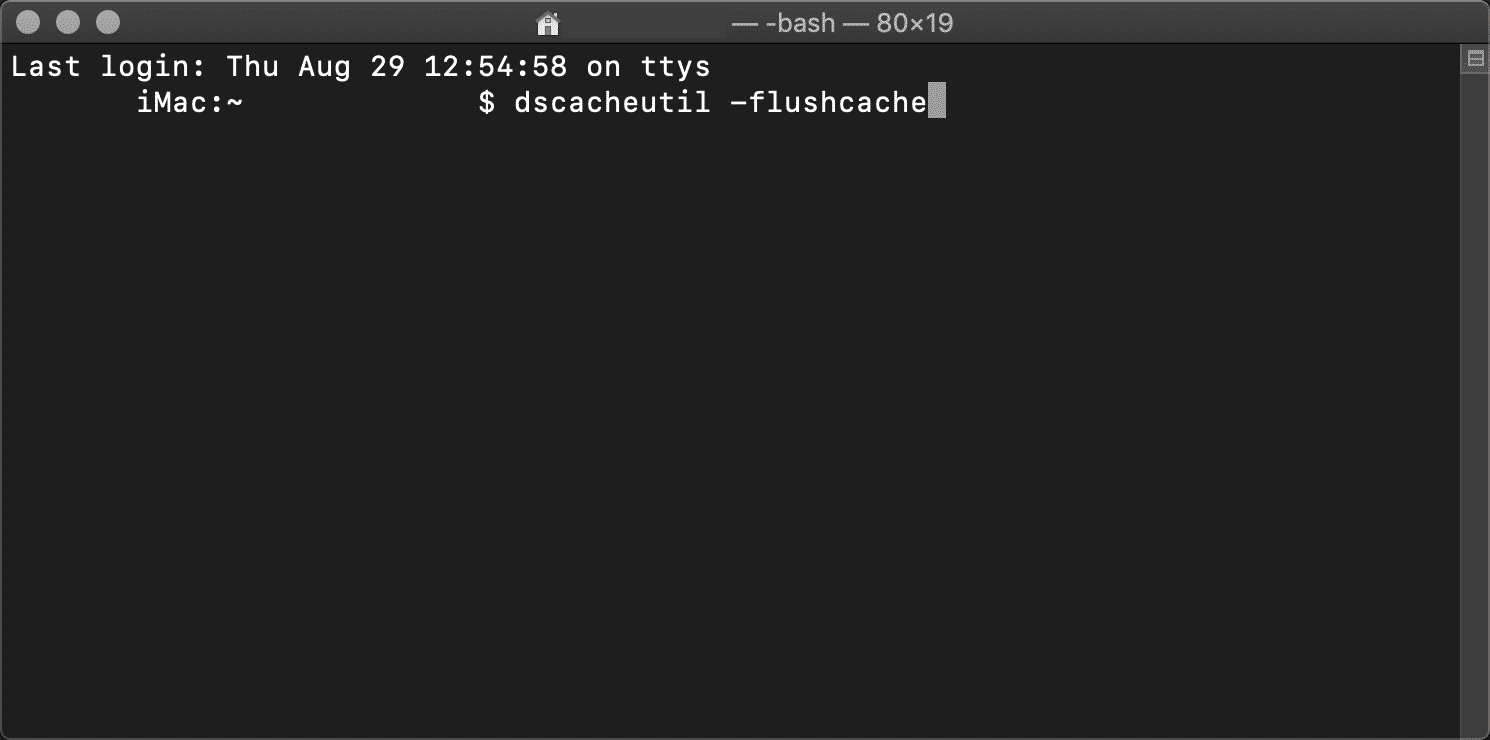
Mac flush cache
Note: There is no success message on Macs.
6. Clear Browser Cache
Web browsers store information in cache on your computer. This includes your browsing history, saved login data, and cookies – all of which are recorded in order to load the relevant pages more quickly the next time they’re visited.
Although they’re useful, caches can cause numerous issues when they become outdated. Fortunately, this problem is easily solved by clearing your cache.
But before you do that, you can easily check to see if it’s a browser cache issue by first opening up your browser in incognito mode. Or you can try a different browser. If you’re still seeing the error, then you will want to proceed with clearing your cache.
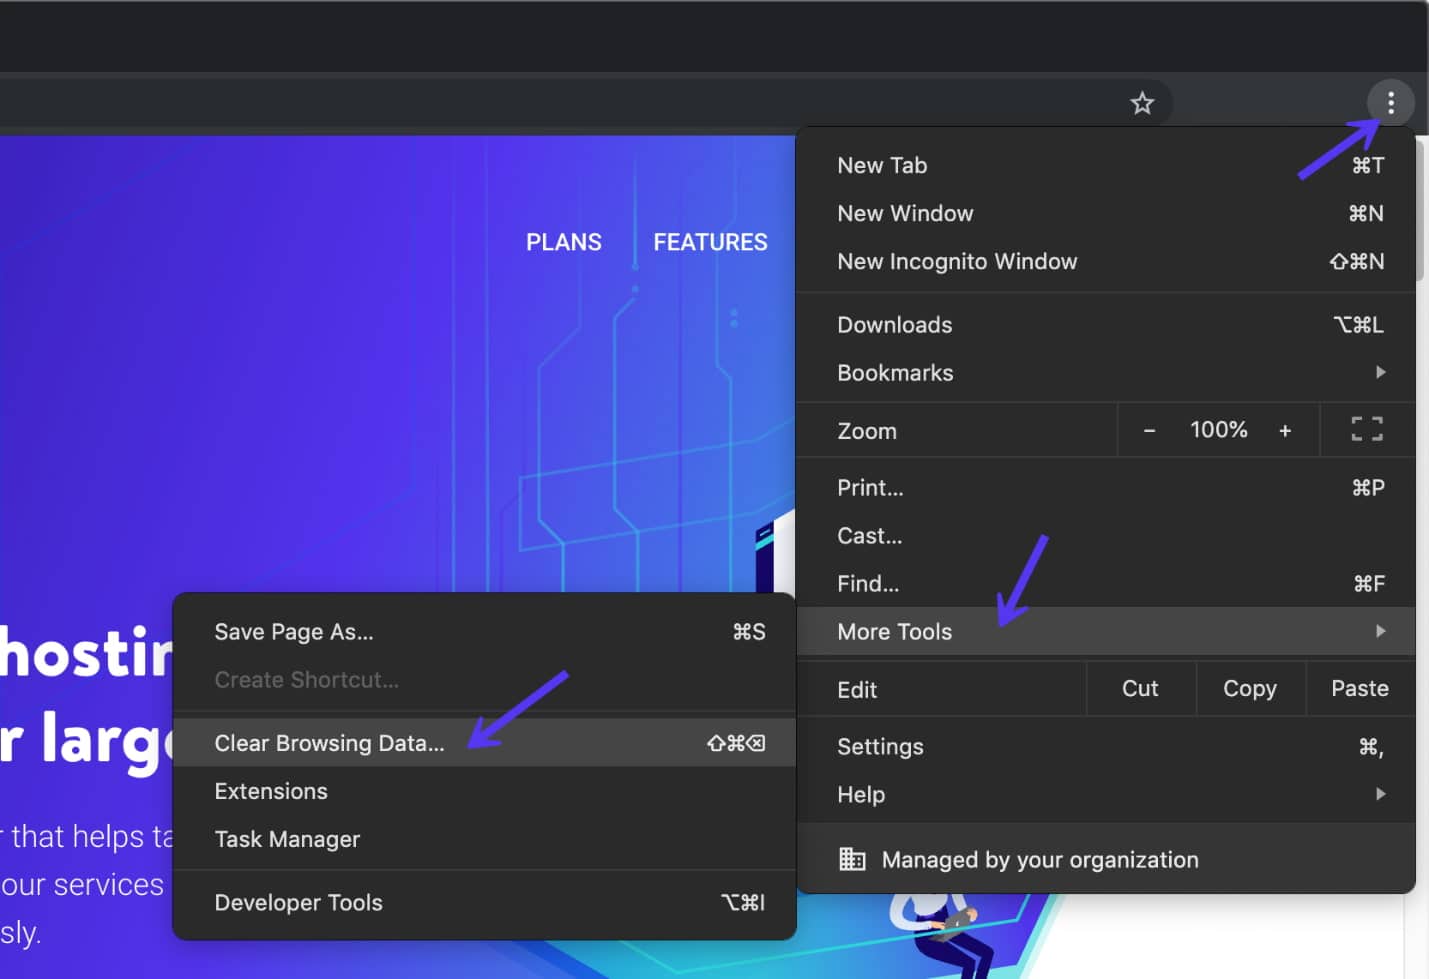
In this example, we’ll be using Google Chrome. Begin by opening up the primary menu (in the top-right corner of your browser window). From there, select More Tools: You can then click on Clear browser data.
Chrome clear browsing data
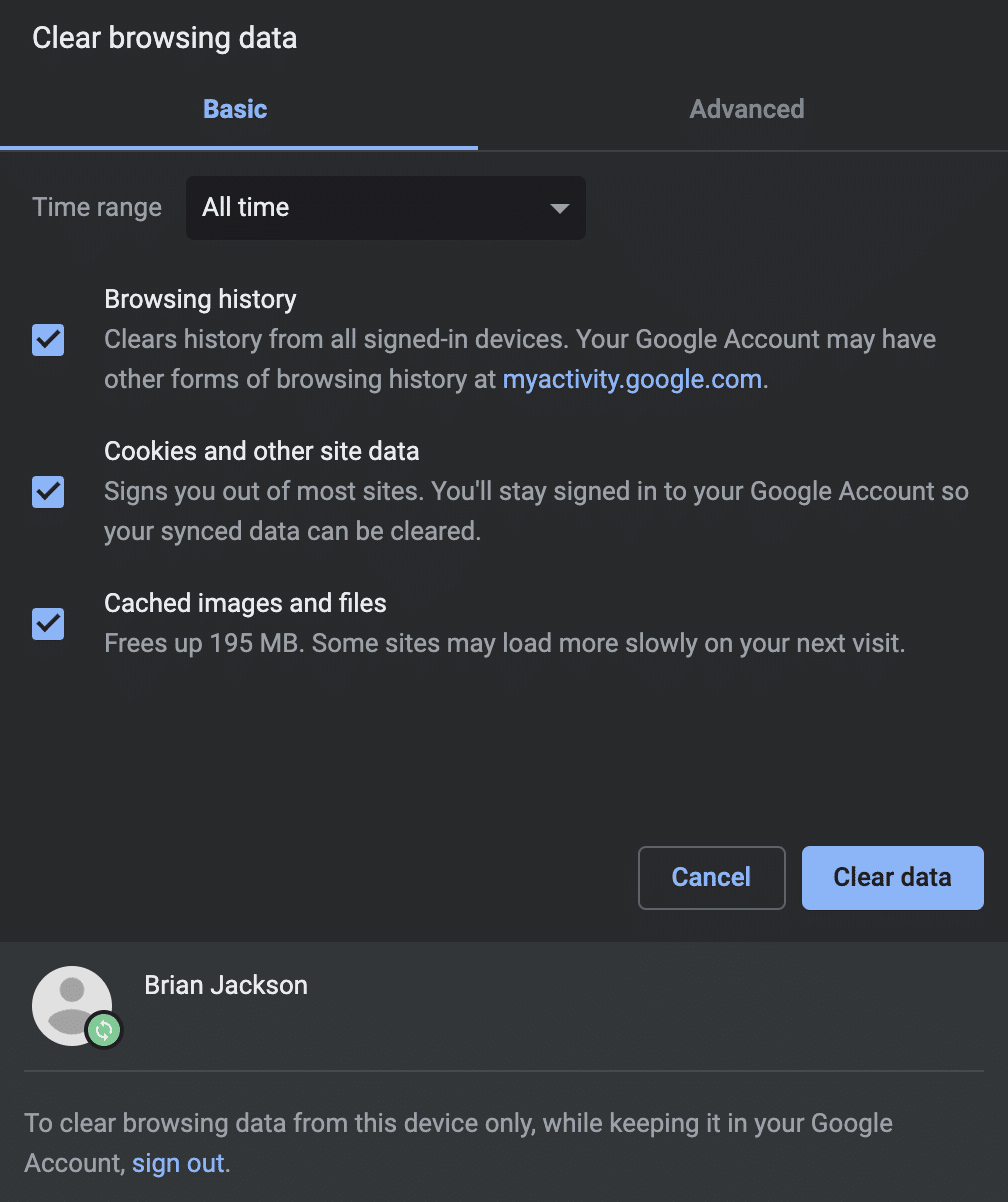
On the resulting page, you’ll need to make sure that all listed file categories are selected. If they aren’t, Chrome won’t be able to empty the entire cache. Instead, it will simply remove the most recent entries, which won’t result in the desired effect:
An alternative method of completing this process is to enter the following URL into your address bar:
chrome://settings/clearBrowserData
The resulting screen should grant you access to the same options we’ve outlined above.
Summary
Connection and timeout errors are never fun to troubleshoot, but hopefully, you have a little more knowledge in your toolbelt now to help resolve it
